
Christmas Cookies are on the menu in Book recipe, and we are going to teach you how to make this delicious recipe from scratch!
Another set of easy yet fun designs to make this Christmas season!
I’ll walk you through decorating these festive bright designs in real-time! I always try to include any tips that will make it easier for you when I can.
If you are a beginner, don’t worry too much about getting right up close to the edge of the cookie. It comes with practice, as does getting the right icing consistency. Take your time and use your scribe, and always have fun!

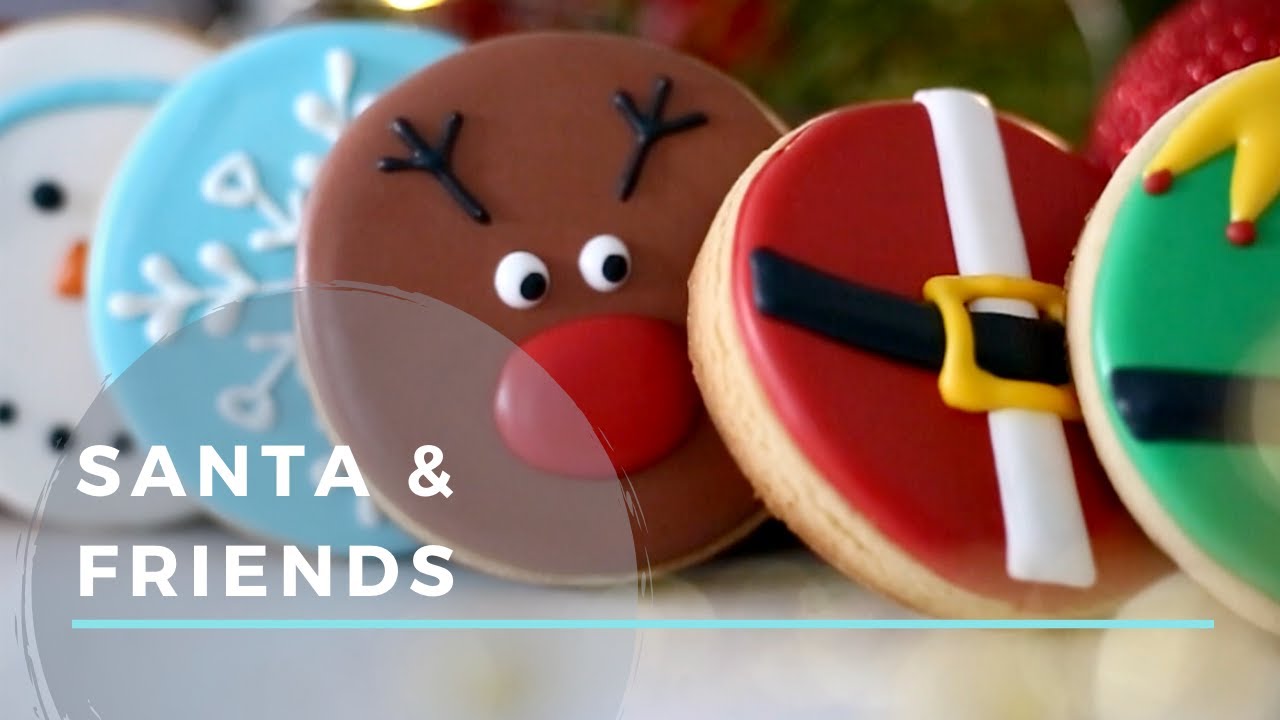
Snowman Snowflake Elf Santa Rudolph Gingerbread


anyone so this is what we’ll need you’ll need
Your cookies tipless bags a scribe tool or a toothpick if you don’t have one some scissors and of course your colors here i’ve got my colors in an outline and a flood consistency if you need help on consistencies i’ll link my consistency video below so first things first is we need to cut our tipless bags so make sure that you’ve got your seam facing upwards
In the middle of your bag and squish your tip flat and make a small cut at the end of your bag so we’re going to touch down on our cookie and outline the edge of the cookie take your time and go around slowly and you can see i’ve lifted my bag up to get a nice smooth line if i pipe too close to my cookie you won’t get that smooth straight line so i want to keep it up and as i come to
The end of my outline i slowly lower my bag before i get there and touch down where i’ve started you can always go in and fix the outline where you’ve touched the end in the beginning together and smooth it out with your scrub so here i’ve got my flood consistency this is a little bit thicker than i usually have because it is a smaller cookie than i usually make and i don’t want to over flood it
So this one we are going to put a few drops of red icing in it while it’s still wet so i don’t want to fill the cookie up too too full of icing so i’m just gonna kind of roughly go around here you see there’s a little bit of gaps in the icing and i’m just gonna run my scribe not really scraping the cookie just hovering above just to get the icing smoothed out
And once we’re smoothed out i’m gonna grab my red flood icing and we’re gonna put it in while the icing is still wet and this will give us a nice flat look to the cookie this will be our gingerbread face so these are the cheeks here and you can go in with your scribe if you have a little peek of icing just to smooth it out and then we’re
Going to put this aside and let it dry and add some details later
all right now we’ve got our rudolph cookie so we’re gonna use the same colors and we have our brown outline that we’re gonna do again and same thing we touch down we lift up the bag with a little bit of pressure run the
Outline of the cookie and then slowly let go of the pressure and touch down when you get to the end it takes a little bit of practice to time your piping line to come back without going over but if you have to overlap that’s okay you can always fix it with the scrub and then we’re going to let this outline dry for a couple minutes but since this is a
Video we sped it up a little bit for you and we’ll bring it back and we’ll go flat the reason i like to dry my outline is because it holds the shape better so if i don’t dry it it doesn’t really hold my flood in and so that’s why i like to do that so i’ve let this dry for a little bit so that the top has crusted over and i’m going to add my details so we’re just going to put a couple of antlers on here
And some eyes and we’ll do his nose all my consistencies here that i’m using are my outline consistency they’re thicker so that they hold their shape again these are very small details so we want them to make sure that they hold their shape and not just run like a flood icing would
now we’ve got our santa belly cookie i love this one okay so you can start with your outline
Again and once in a while you get bubbles in your bag or your stream of icing breaks especially when it’s your outline and if it doesn’t work you just scrape it off with your scribe and you just restart and don’t worry you won’t see this afterwards it’ll be covered by your icing once in a while you get a little bit of icing on the end of your tip and it makes it a little bit
Messy when you go to pipe outlines on your cookie so then you can just use a paper towel i use a little bit damp paper towel and just to clean up the tip so that it’s clean when i’m starting my outline once again we’ll outline i’ll let it dry for a few minutes and then i’ll come back and flood normally if i was doing these on you know by myself without filming i
Would do all the outlines of my cookies first and then by the time i go back to flood the first cookie the outline should be dry enough to continue but because this is a video i’m just doing one cookie at a time for you guys but you don’t see that i actually do leave these to dry the outline and also the flood when it crusts over i always put them aside and i work on
The other cookies while those ones are drying so that i’m not sitting and wasting kind of time waiting around okay when doing your belt details you can see that it’s sort of bumpy because i have different layers underneath so i’m just using my outline consistency and i’m just i’ve done a rough outline
Of where i want the belt to be and i’m just gonna go over it and put a little bit more pressure on my bag just to make it a thicker line because there’s so many different levels because of the white part and the black belt if i try to fill it in and sort of make two lines and it’s a very small detailed area it it’ll be hard so this way you just put a little bit of pressure make a
Thicker line and then we’ll fix it up with the scribe and it’s sort of an easier way to do that detail and that’s your santa cookie so next up we’ve got our elf cookie and so again i’ll show you just in case you missed it before how to cut your bag so make sure your seam is always in the middle and you always want to cut a small tip if you need to go bigger you can always
Stop you know your outline or mid flood and make it bigger if it makes it easier for you once again i’ll outline my cookie let it dry for a few minutes and we’ll come back and flood once the flood is done we’ll dry the cookies for a little bit longer if you have a dehydrator it’s great to use that to speed up the process if not you can leave them on the counter in front of a fan if you do or just
Leave them out in the open on the counter you never want to cover your cookies because they need the airflow to dry and once they’re sort of crusted over which means you know you could sort of touch the top very lightly and you won’t have an indent if you put a little bit of pressure on it will break the icing because the icing underneath is still wet
soi’m just going to complete all my details with my outline consistency once again these are really small cookies and when you have a small area that you even need to flood you can do it with your thicker icing consistency because what happens is it’s such a small area that it’s very
Easy to smooth out when you’re doing a larger area you need a looser flood to smooth out but when you’re doing a tiny little area here the more that you wiggle and jiggle that icing the more it settles so it’s very easy to do when it’s such a small area you can see sometimes i go in there and use my bag and sort of wiggle my bag and icing melts together
if you’re a beginner it’s easier to do a thicker outline than the thinner outline so just keep that in mind and you don’t always have to go right to the edge of the cookie you can go a little bit inwards from the cookie same thing with your flood you don’t want to have a huge hole in your bag
Because then it’s very hard to control how much flood is coming out until you get your consistency down and you’re comfortable with you know using a piping bag and putting pressure with it so always start a little bit small if your icing is you know you’re not moving fast enough on your cookie if your icing is sort of piling up and it’s not coming out of the bag smoothly then you have to move
Your bag a little bit faster because you’re putting too much pressure on it if your icing is too flowy then don’t put too much pressure if your icing isn’t on the thicker side you’ll have to put more pressure on your bag so just play around with it and get comfortable with feeling the the bag and the pressure and your icing consistencies so here i’ve got my stiff outline consistency icing
And this is you know you can do any design here for a snowflake i’m just going to do something simple here and when i do the details what i’m going to do is put a little bit of pressure on the bag to be able to do the edges of the snowflakes and so what it is is once i’ve finished all my outlines i put a little bit of pressure on the bag and then i pull away and then again put pressure pull away
Pull pressure and pull towards that line so all i’m doing is putting a little bit of pressure on to build up a bubble sort of a little bit of icing and then i pull towards the line so that my line comes a little bit thinner this is called pressure piping as you’re putting pressure and then letting go to make different designs [M
so let’s talk about the snowman’s
Nose here when i have really small details to do i always use my outline consistency and i’ll sort of outline and then i’ll flood right away and then i’ll go in with my scribe and fix up the nose or whatever detail i’m doing so if i want a really pointy nose i can just pull it out with my scribe or i can make it rounded you know it makes it much easier
When you have smaller details to go in with your scribe than with your piping bag because your scribe has a much finer tip and then we’re going to add some eyes and a big smile and of course some ear muffs okay so for the ear muffs we’re gonna add the sides first just so i know where to connect my line for the top part so i’m gonna go from
One and just do one line and again i’m always picking up my piping bag to get a smooth line it gives us a nice smooth curve instead of a sort of wiggly icing curve and then i’m going to go in closer and follow my line to do a second line sort of right beside it and then go back one more time right on top and i’m going to put a line sort of right over those two lines just to make
A thicker line it’s hard to get these very you know to do an outline and then fill it when they’re such small narrow parts so i just go in with my outline consistency and as long as you work somewhat quickly you can smooth it all with your scribe again thank you guys so much for watching if you guys try to make these designs i’d love to see them and if you have any
Questions as always you can ask them below happy baking
Let us know what you think of today’s Christmas Cookies tips, tricks and hacks! Which one was your favorite Cookies?